
Extrinsic calibration defines the camera positions, orientations, ground plane, and world origin of your capture volume. This process establishes a consistent 3D coordinate system that all cameras share.
Prerequisite requirement: Minimum 6 camera setup should be used for Checkerboard calibrations, 3 cameras must see the board at all times for successful detections.
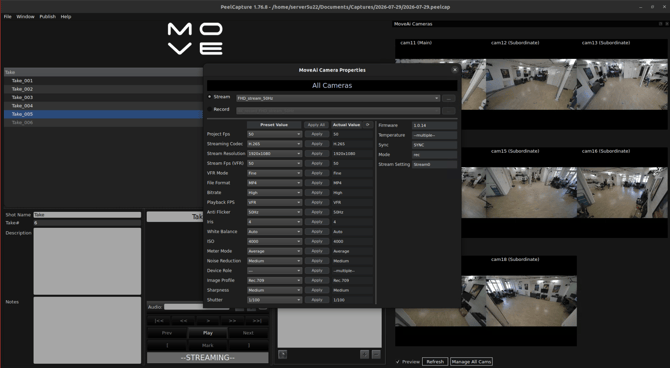
1. Setting up Peel Capture for Extrinsic Calibration
Note: When capturing an extrinsic calibration in Genesis Live, make sure you are using Stream mode in Peel Capture.
- This guide assumes you have already set up your project. If not, see Real-Time Intrinsic Calibration.
- Set Stream mode to enabled.
- Now that the cameras are streaming, switch to Genesis Live.
2. Key Principles for Capturing an Extrinsic Calibration
Extrinsic Calibration
Watch this video to see how to capture the extrinsic calibration.
Key Principles
- The position of the checkerboard during first few seconds of the calibration recording define the world coordinate system (0,0,0).
- The orientation of the checkerboard defines the X, Y and Z axes of the world.
- Keep the capture volume completely empty for the first 2–3 seconds of recording.
- Move slowly and smoothly.
- Walk in a spiral path toward the outer edges of the capture volume while keeping the checkerboard facing inward. Keep an eye on the keypoint detection for each camera, paying extra attention to those with fewer detected keypoints.
- Ensure that as many cameras as possible have coverage of the checkerboard position. A minimum of 3 cameras must be able to see the checkerboard.
- Avoid sudden or fast movements that introduce motion blur.
3. Capturing Extrinsic Calibration in Genesis Live
Prerequisite - All cameras in the project must have a successful intrinsic calibration before you can proceed with extrinsic calibration.
When capturing an extrinsic calibration, make sure the Genesis Live application is visible on your monitor so you can view the Z Cam stream while calibrating in the capture space.
Note: In our studio, we connect the computer to a TV so we can see a clear image while capturing the extrinsic calibration.
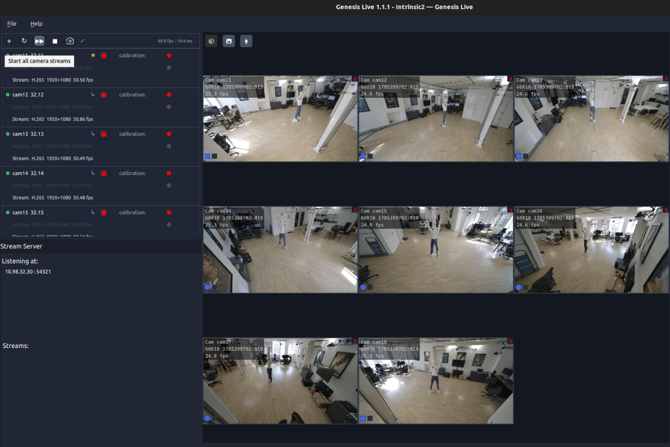
- Click Start All Camera Streams
- Note: All project cameras must be streaming before capturing an extrinsic calibration.
- The cameras will show a flashing amber light in the camera list, indicating that the Z Cams are recording.
- If the light isn't flashing, click Sync all camera info to update the camera status.
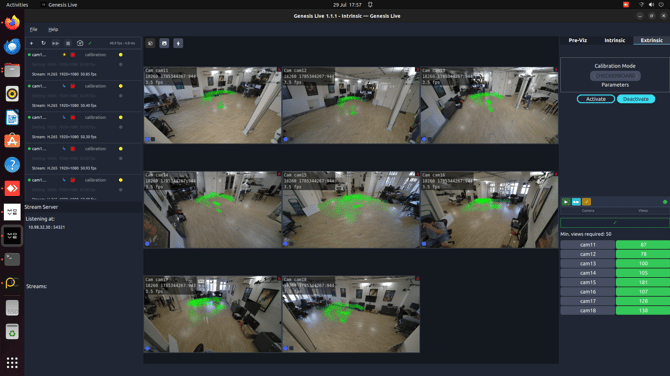
- Click Extrinsic>Activate
- Before proceeding, confirm the calibration mode is set to Checkerboard and position your checkerboard at the centre of the capture volume where your world origin will be defined.
- Click Start Recording Detections
- The streaming cameras will appear in a list alongside their detection points, which will continue to accumulate over time.
- Enter the capture volume and pick up the checkerboard to begin the extrinsic calibration process.
- Green perimeter indicators around the border of the camera mean that 3 or more cameras have coverage of the checkerboard in the space.
- Orange perimeter indicators around the border of the camera mean that 2 or fewer cameras have coverage of the checkerboard in the space. This means no detection points are being accumulated."
- Walk around the entire capture volume, moving the checkerboard in varied orientations and directions to ensure all cameras can detect it. Continue until you have gathered enough detection points across all cameras.
- Keep an eye on the detection points and prioritise any cameras that are accumulating fewer points by focusing on different areas of the capture volume. Be sure to cover the entire space to ensure complete coverage.
- Note: At least 3 cameras must detect the checkerboard simultaneously for a detection point to be accumulated. If the system is not detecting many points, you may need to adjust your camera framing to ensure the checkerboard is visible to enough cameras.
- Once all cameras have surpassed 50 detection points they will turn green in the viewport. When you are satisfied with the detection coverage, end the recording and press Compute Extrinsic Calibration to calibrate.
- A loading bar will appear while the system processes the calibration, this typically takes 5–10 minutes depending on the number of detection points captured.
- Once the loading bar turns completely green, click Apply Latest Calibration Results to apply the calibration.
- This will update the status of each camera in the camera list. A green dot will appear next to each camera which confirms that both intrinsic and extrinsic data have been successfully captured and the system is ready for pre-vis.
- Click File>Save all to save the latest changes to this project.
- To verify the calibration has been successful, you can enable the 3D overlay, the camera reprojections will be shown on each camera preview.
- Note: If any cameras are moved, the space will need to be recalibrated. You can tell a camera has moved when its overlay position no longer matches its real-world position.
Next Step: Using Mocap→ Continue to the next article in System Prep & Setup.