Process a Calibration Take
💡A Calibration take is used to inform the system of the positions & orientation of your cameras. This is the information the system needs in order to track the actors in subsequent Action Takes.
Note - this must be done before processing an Action Take
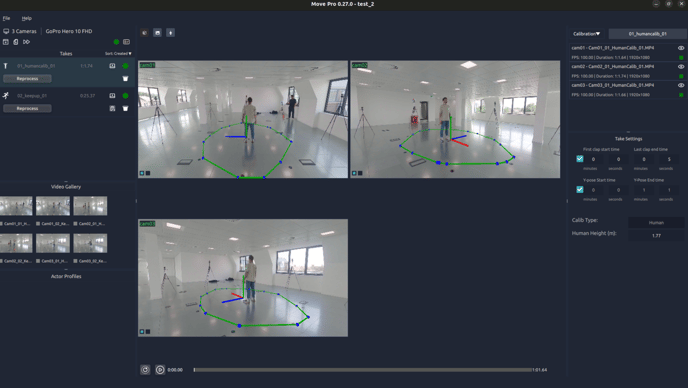
- Enter the clap and action times:
- If your videos are already sync'd, untick the 'sync using claps' button, otherwise, watch the video and note down the following timestamps:
- The time the actor begins clapping
- If your cameras began recording at slightly different times, enter the time from the earliest camera.
- The time the actor finishes clapping
- If your cameras began recording at slightly different times, enter the time from the latest camera.
- The time the actor begins clapping
- Enter the action times:
- The time the actor begins the Y-pose
- The footage will now be in sync, so enter the time from the earliest camera.
- The time the actor finishes the Y-pose
- Again, enter the time from the earliest camera.
- The time the actor begins the Y-pose
- If your videos are already sync'd, untick the 'sync using claps' button, otherwise, watch the video and note down the following timestamps:
- Enter the actor’s height in meters, excluding footwear
- Click Start
-
While the Calibration take processes, you can queue Action Takes, so that they will automatically begin processing when the Calibration Take finishes.
Reviewing your Calibration Take
When the Calibration Take has finished processing, it's good to check the quality of it
- In the viewport, you can see the camera icons overlayed on top of any visible cameras in the videos, if the overlays are not positioned correctly, this indicates a poor quality calibration.
- If you click the calibration results button, you can check out the calibration report, which contains the Calibration Mosaic

- This visualisation shows the overlay of the 2D and 3D tracking from each camera's perspective. The blue skeleton is the independent observation from each camera, whereas the red skeleton is the 3D estimation shown from each camera. If there is a large difference in the alignment of these skeletons in one/some cameras, this indicates an outlier, that you should consider removing from your session. If the skeletons are very close, this is a sign of a good calibration.
- In the viewport, you can also see the Active Area overlay.

-
- When you perform a calibration, the system uses the starting location of the Y-pose sequence to define the origin of the 3D calibration. It will then track the furthest locations you walk in each direction away from the origin, to define the desired perimeter of the capture volume by connecting those locations in the form of a convex hull. This ensures that during the action takes, only actors within the capture volume will be tracked.
- This can also be used to verify the framing of your cameras is adequate, as it is strongly recommended that the entire capture volume can be seen in all cameras.