Note: A valid calibration is required to process motion. Ensure you have completed the calibration steps before beginning your animation takes
To Record an Action Take:
- Stand in the centre of the capture area.
- Start recording on the cameras.
- Stand still in a T pose for 2 seconds before starting the calibration sequence.
- It is essential that you are standing within the perimeter that you calibrated, for the system to track you.
Note: If you are not using a synchronised camera such as a Z Cam, you will need to clap three times above your head before performing the T-pose. This will generate a distinct audio peak, which can then be used as a synchronisation point
-
Now, perform!
- Make sure the actor remains inside the capture volume throughout the action take.
- When you are finished, stop your recording.
- Note: We always recommend doing an extra calibration at the end of your session, just in case a camera was moved during the session.
Here is an example
Note: This example action was taken using the Z-Cams, which is a synchronised camera system, so the actor doesn’t need to clap sync.
In this example, you would enter the following sequence times:
- Sync method: Sync
- T-pose sequence start time: 00:02
- Sequence end time: 01:10
Football Ball Tracking: The Multi-Cam system is capable of tracking balls. To ensure accuracy, the ball must start stationary and clearly visible on the floor within the capture volume. While alternative balls can be used, they must be spherical, of similar size and bounce to a soccer ball, and provide high contrast against the environment.
To Record a Multi-Actor Take:
-
Position yourself in the center of the capture area. We recommend that actors maintain a 1 metre distance from one another to ensure the system has clear visibility.
- This step is essential: the system identifies the actor at the beginning of each take and calculates their specific bone lengths. The Move rigs (Move Mo and Move VE) will scale to the height of the actor in the space this can be be seen in the output.
-
Start recording on the cameras.
-
All actors should stand still in a T pose for 2 seconds before starting the action sequence.
Note: If you are not using a synchronised camera such as a Z Cam, you will need to clap three times above your head before performing the Y-pose. This will generate a distinct audio peak, which can then be used as a synchronisation point.
- Now, perform!
- Make sure the actor remains inside the capture volume throughout the action take.
- When you are finished, stop your recording.
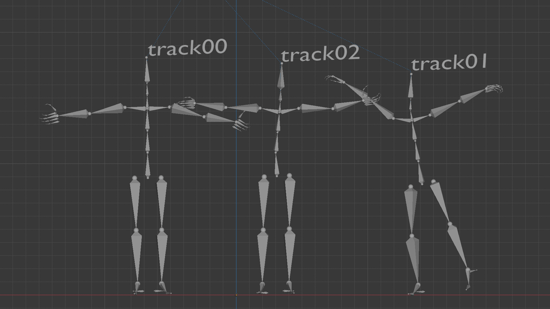
Here is an example
Note: This example action was taken using the Z-Cams, which is a synchronised camera system, so the actor doesn’t need to clap sync.
Note: This example action was taken using the Z-Cams, which is a synchronised camera system, so the actor doesn’t need to clap sync.
In this example, you would enter the following sequence times:
- Sync method: Sync
- T-pose sequence start time: 00:00
- Sequence end time: 00:43
Next Step: Harvesting your Action Takes → Continue to the next article in Capturing your Animations.
Alternatively, explore how Record an Actor Profile can be used to optimize your capture output.